Access 2000
Level 1
Instructor Ramblings | Tips | Challenge Labs
Instructor Ramblings
From Jim, the TA: Optional?
Hello all. In our technical world some things are optional but in creating a Database, a good design IS NOT optional, it is absolutely required. Databases that are poorly designed can cost a businessman/woman many dollars. In a poorly designed database, you simply will NOT be able to extract certain information because of the poor design. So when studying Lesson 2 which covers Table Design and use, pay particular attention to the design of the tables.
Exciting Article Link!
An exciting article link!: Tips on Database Design and Use. And it's got some nifty links off to the side that you all might want to check out, too :-)
databases.about.com
One of the many, many newsletters that come flying into my inbox (only to be immediately shuffled to an archive folder...) is from databases.about.com. I found an article link, "Building an Access Database From the Ground Up", that might be useful and/or interesting for you all to look through (or at least bookmark).
Chapter excerpt from a book about Access 2000 Programming
I know that most of you are not ready yet to tackle Access 2000 programming, but you might want to bookmark this chapter excerpt from Teach Yourself Microsoft Access 2000 Programming in 24 Hours anyhow :-): Hour 20: Adding Data to Web Pages.
Access 2000 post-Service Pack 3 hotfix package: March 24, 2004
Here's a Microsoft Knowledge Base article dealing with Access 2000 and the Office 2000 Service Pack 3: Access 2000 post-Service Pack 3 hotfix package: March 24, 2004
Tips
From my personal archive of ZD/Element K tips:
Add descriptions to Access database objects
Regardless of how detailed the names you assign to database objects are, chances are you find yourself repeatedly opening and closing objects just to find out more information about a form or table that you haven't worked with for some time. You can save yourself some work if you invest a little time after creating a database object to fill in its Description property. Once it's set, you can view the description details within the Database window, next to the object's name. To set the property, select the object in the Database window. Then, choose View | Properties from the menu bar or right-click on the object and choose Properties. Type the description and click OK. To view the text in the Database window, choose View | Details from the menu bar.
Quickly move to an Access datasheet column
When you're working with a table in Datasheet view that has many fields, navigating between columns can be a pain. Fortunately, there's an easy way to move to a particular column. Simply choose the name of the field you want to move to from the Go To Field dropdown list on the Formatting (Datasheet) toolbar. The focus will move to the appropriate field within the current record.
Turning off AutoCorrect in Access
By default, Access has the AutoCorrect turned on. Unfortunately, that setting could cause a few problems during data entry. For example, suppose you have a customer database, and you have a record with a customer code of BCAK. The AutoCorrect feature will automatically change it to BACK as soon as you enter it into your table. To turn off the feature, choose Tools | AutoCorrect from the menu bar, clear the Replace Text As You Type checkbox and click OK.
A shortcut to open Access objects in Design view
When you need to open an object in Design view, you probably select the object in the Database window and then click the Design button. However, you may prefer this alternative method--simply hold down the [Ctrl] key and double-click on the object you need to open.
Using an ampersand in an Access control Caption
If you've ever tried to include an ampersand (&) in the Caption property of a control, you've probably found that the results are different from what you expect. For instance,
Caption: This & That
Displays: This _That
That's because Access interprets the ampersand as a means of setting up a shortcut key combination to let you select the control. The trick is to use two ampersands (&&) instead of one in the Caption.
Caption: This && That
Displays: This & That
Quickly change an Access control's type
You'll likely come across situations where you want to change a form or report control's control type. For instance a field that's set up as a combo box lookup at the table design level will appear as a combo box when it's added to a form. This is often convenient, but if you're displaying the data in the field as read-only, it makes more sense to display the information in a regular text box than a dropdown control. Fortunately, it's easy to change the control types for many form and report controls. Just right-click on the control you want to change, select Change To from the shortcut menu and then choose the new control type you want to use. The new control type has to be functionally similar to the original control type, so only the valid control type selections will be enabled in the shortcut menu.
Open an Access object from your Windows desktop
To open an Access object, such as a form or report, directly from the Windows Desktop, simply create a shortcut to the object. To do so, in the Database Window, right-click the object you want to create the shortcut to. Then, select Create Shortcut from the shortcut menu. Click OK in the Create Shortcut dialog box. When you do, Windows places the shortcut on the desktop. To test it, close Access and double-click the shortcut icon. Windows not only launches Access, but also opens the appropriate database and the object as well.
Easily simulate 3-D labels in Access forms and reports
Although most Access programmers are probably not as skilled at graphics as they are at database design, here's a simple technique you can use to add pizzazz to forms and reports with 3-D effects. Open the object you want to modify in Design view and select the label that you want to apply the effect to. Then, display the label's property sheet, and ensure its Back Style property is set to Transparent. Next, set the Font Size property to at least 12 and the Font Weight property to Bold or heavier. Finally, pick a "highlight" color, such as White (16777215), for the Fore Color property. Any color can be used as long as it contrasts with the form's or report's background color AND it contrasts with the usual label color of Black (0). Note that you may need to resize your label at this point to see all of the text.
Now, right-click on the label and choose Copy from the shortcut menu, right-click elsewhere on the form and choose Paste. Change the new label's Fore Color to Black (or any dark color). Then, simply move the new label over the old one with your mouse and adjust the position using the [Ctrl] key in conjunction with the keyboard arrows. To achieve a raised effect, adjust the labels so that the lighter text is one grid unit to the left and up from the darker text. Also try the opposite--place the lighter text below and to the right for a different illusion. If you want, you can take 3-D effect further by adding a third "shadow" color.
Center an Access report's title text
When you want to center a report title, you can do so by dragging its label with your mouse. However, this approach can take a little more trial and error than you may have patience for. As an alternative, you can try taking advantage of the Center alignment button on the Formatting toolbar. But this will center the title only within its control and not between the left and right margins of your report. The trick is to make the control the size of your report. Simply position the top-left corner of your title control at the left edge of the report. Then, increase the width of the control to the right edge of the report. Next, center the title within the control, and it will be perfectly centered between the left and right margins of your report.
Automatically compact your Access databases
Most users know that regularly compacting an Access database allows it to run more efficiently. Doing so can reduce the file's size and defragments the data. However, knowing something is a good practice and remembering to do it are to different matters. Fortunately, Access 2000 can handle compacting files without your input. Just select Tools/Options from the menu bar. Then, click on the General tab, select the Compact On Close check box, and click OK. If the database will be reduced by at least 256 kilobytes when you close it, Access will automatically compact and repair the file. You should be aware that this setting needs to be activated on a file-by-file basis.
Quickly copy table structures within the same Access database
Sometimes, you'll want to copy an existing structure within your current database. Fortunately, doing so is easy. Simply select the table that has the structure you want to copy in the Database window. Then, choose Edit | Copy from the menu bar. Next, select Edit | Paste and Access displays the Paste Table As dialog box. To create a new table with the same structure, enter a name in the Table Name text box, select the Structure Only option button and click OK. Note that if your database contains two tables with the same structure you can also use the Paste Table As dialog box to append data from one table to the other.
Insert line breaks when entering text in Access
When you're using a form to enter text in a memo field, pressing [Enter] within the text inserts a line break. However, when you're working with a memo in a table's Datasheet view, pressing [Enter] moves the focus to the next field. You can force line breaks when you're entering text by pressing [Ctrl][Enter]. This technique also works with text fields and can be applied when you're entering text in labels or tex boxes on a form. To permanently configure a text box so that pressing [Enter] inserts a new line, set its EnterKeyBehavior property equal to New Line In Field.
Evenly distribute text within controls
When you add form or report controls, it's likely that you don't bother to change the Text Align property from its default General setting: characters align to the left of the control while numbers and dates align to the right. When you set up controls to act as headings or titles, you can achieve interesting visual results by changing the Text Align setting to Distribute. This setting distributes characters within the control evenly to span its entire width. If you apply this setting to a textbox control, the alignment switches to Left alignment when you click inside the control to allow for easy data entry.
Print a hardcopy of Access database relationships
When you're documenting your database applications, you may want to include the same visual diagram of your table relationships that's available through the Relationships window. In Access 2000 and 2002, this is easy. Simply display the Relationships window as usual and then choose File | Print Relationships from the menu bar. Doing so displays a report preview that you can then print or save. This functionality isn't built into Access 97, but users of that version can download an add-in that performs similarly. To get the add-in, download the file PRELS80.EXE from the following Web page: http://support.microsoft.com/support/kb/articles/Q175/2/02.ASP.
Create a default Access form template
If you always want to use the same standardized custom form, you can change Access's default form. To set up a custom template, create your template form by specifying all the properties you want to maintain from form to form. Then, save the form using any name. Next, select Tools | Options from the menu bar and select the Forms/Reports tab. Enter your template's name in the Form Template box to replace the Access default (Normal) and click OK. The next time you create a form, Access will base it on your form template rather than the typical Normal template.
Eliminate extra trips to the Toolbox
When you add controls to forms and reports you'll often need to add several of the same type, such as when creating a group of option buttons or a series of unbound text boxes. In such cases, repeatedly moving between the Toolbox and the object you're designing can quickly become tedious. Fortunately, you can make the process easier. When you select the control you want to add from the Toolbox, double-click the control button. Doing so lets you add as many controls of that type as you need. When you finish, click the button again to disable the control tool.
Quickly create copies of form and report controls
When designing forms and reports, you'll often want to base controls upon existing ones to speed up formatting or configuring their properties. Although you can create copies of controls by selecting them and then using the standard Copy and Paste commands, there's an even easier way. Simply select the appropriate controls and then choose Edit | Duplicate from the menu bar.
Assign a control as a form's default action button
When you create forms, you may want them to perform a default action when a user presses the [Enter] key. For example, you may want pressing [Enter] to close the form, save a record, or abort a process by default. Assigning a default command button action that should be performed is especially helpful when a form contains several buttons. It's easy to designate the command button that should be associated with the [Enter] key. Simply set the button's Default property to Yes. Note that doing so does not set focus to the control when you view the form. Likewise, if another command button has focus, pressing [Enter] executes that button's code. However, assuming no other command button has focus, pressing [Enter] will perform the action linked to whatever button is flagged as being the form's default.
Quickly copy data to other Office applications
If you want to display data from Access in another Office application, there are a number of ways to approach the task. However, one of the easiest may not be obvious. When you need to copy an entire table or query recordset, simply drag the appropriate object icon from the Database window to the Office document with which you're working. Using this approach with Word or PowerPoint creates a table and using it with Excel populates a range appropriately.
Maintain alignment when moving controls
Although the ability to drag controls to a desired place on a form or report provides you with flexibility, it's also a source of frustration. You'll often want to move a control in one direction and accidentally drag it diagonally. Fortunately, it's easy to restrict a control to just horizontal or just vertical movement. To do so, press the [Shift] key before selecting the control. Then, simply drag the control in the appropriate direction. Based on the initial direction, you'll only be able to move the control left and right or up and down.
Challenge Labs
The Coupon Database
You've been asked by a close female relative to design and create a coupon database so that she can keep her New Year's resolution to use coupons more. Here are some of the typical coupons she has:
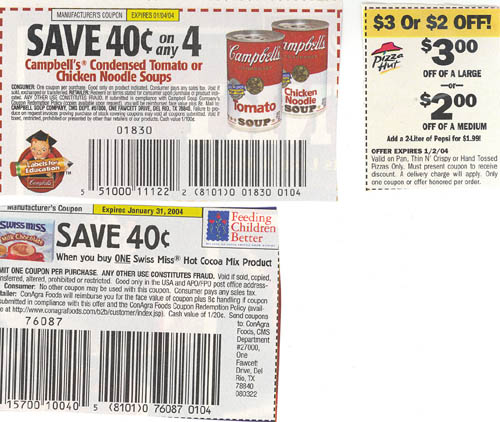
Nearly all coupons have expiration dates but some do not. She also has duplicates of many of the coupons. Some of the coupons are store-specific, but most are good at any store.
She currently keeps them all in a box and doesn't use them much because it's a real pain to have to sort through all of them each time looking for a specific item. She received a small take-along coupon organizer for a holiday present and is planning on at least putting the coupons into general sections such as cosmetics, breads/cereals, dairy products, frozen foods, etc.
In order to plan a food shopping expedition she wants to be able to have a report of all coupons for a specific item type (cereals, for instance) to print out and take with her. She also thinks it would be neat if the program could tell her when coupons were expiring so that she could use them before that date (kind of like how her financial program tells her when her bills are due).
Oh, and she's had a computer for several years but knows nothing about how Access works.
Some of you might want to fire up Access and start creating tables. However, life is made much easier if we first figure out which data needs to be stored. You can even use paper and pen/cil for this step. Don't worry about tables yet. Just think of data fields and we can group them together in Step 2.
And, here, I'll give you a starter one:
ExpirationDate
So, take this first week and come up with a list of data fields and post those here. Please feel free to ask any questions if the above is not clear.
Here's a working list of fields from Week 1 of the Challenge Lab - don't worry if you came up with more or less fields - I'm only posting this so that those who may have gotten stuck can move on :-):
- ExpirationDate
- CouponType (grocery store, restaurant, department store)
- PlaceName (name of store or restaurant, if the coupon is specific, or "any" if not specific)
- ItemType (frozen, produce, deli, dairy, .etc)
- ItemDescription (Campbell's tomato or chicken soup)
- ItemSize (what size package qualifies.for example, what size box of cereal)
- MinimumPurchaseNumber (in case you have to buy ten to get one free, or something similar)
- CouponValue
- CouponNumber (total number of identical coupons)
Your Challenge task for Week 2 is to take the data fields listed in Week 1:
- ExpirationDate
- CouponType
- PlaceName
- ItemType
- ItemDescription
- ItemSize
- MinimumPurchaseNumber
- CouponValue
- CouponNumber
and create tables with appropriate relationships and constraints.
We are still in the pen/cil and paper stage (because we're focusing on the concepts, not the implementation), but if an Access relationship window snapshot should happen to appear, I won't stress over it :-)
Famous People: A Deliberately Bad Database
I've created a deliberately bad database* with one table called "Famous People". Your mission (should you choose to accept it ;-) is to fix the bad design. Please feel free to ask any questions and enjoy! :-)
[From Jim, our TA]
...something sticks in my craw when I see the field titled "Address" being applied to famous people who have all passed away with the possible exception of Louis Armstrong (I'm not sure if he has died or not). I believe that this field should be renamed "Birth Place" or some such.
Then I would break out the two fields "Date Born" and "Birth Place" and create a new table called "Birth date and Place Born". Then I would add a sub-data sheet to the table "Famous People" so that when you clicked on the plus sign you would see the corresponding birth date and birthplace for each person. Be sure and drop the "born in" from the field "Birth Place" for Amelia Earhart as it is not needed with the new field title.
The database table violates several rules, including first normal form: that Famous For 1 and Famous For 2 would be considered repeating fields. To correct that we would have to create a child/many table for the potential many things a person can be famous for.
Our table also violates third normal form by having fields that are not directly related to the primary key, which you picked up with the State Bird and Agricultural Zone. We could keep those fields, just move them to a State lookup table.
Jim had a great suggestion about address being birthplace and that definitely should be considered.
I've attached the most basic correction of the database* here - it has address instead of birthplace, but it will give you an idea of an easy fix for the two biggest problems :-)
![]()
![]()
Alrak's Course Resources ©2002-2007 Karla Carter. All rights reserved. This material (including, but not limited to, Mini-lectures and Challenge Labs) may not be reproduced, displayed, modified or distributed without the express prior written permission of the copyright holder. For permission, contact Karla.